AI Photo Colorization: Bringing Old Black-and-White Photos Back to Life
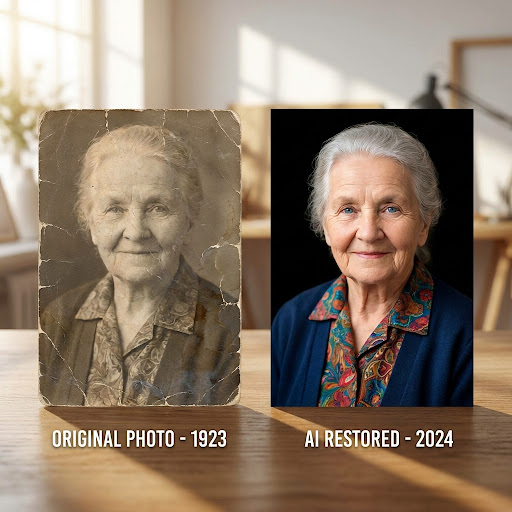
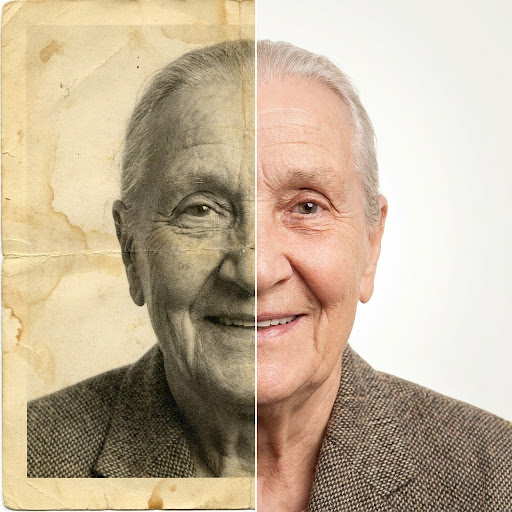
A grayscale photograph captures a face, a posture, a slant of afternoon light. What it cannot hold is the color of the wool coat, the warmth of skin against a cold studio backdrop, the green of the lawn the picnic was held on. For most of the twentieth century, that information was either hand-painted back in by a retoucher or simply lost. AI colorization is the first technology that reconstructs it at scale — and reliably enough that the output is no longer a curiosity but a faithful restoration.
This guide is for anyone who has a stack of family photographs, a community archive, or a single portrait of a grandparent that deserves to look the way the moment actually felt. It explains what DVDFab Store's colorization model is doing internally, where it still benefits from human judgment, and how to prepare your scans so the result is a memory rather than a marketing stunt.
The Problem with Black-and-White Photos
Color photography existed long before it was affordable. Until the 1970s — and in many parts of the world, considerably later — most family portraits, school photos, military records, and snapshots were captured on monochrome film. The omission was practical, not stylistic. Color processing required temperature-controlled chemistry and was reserved for professional work or special occasions.
What this means for anyone digging through a shoebox of family photos: nearly everything from before roughly 1975 is missing the chromatic layer that made the original scene legible. A wedding portrait from 1942 reads as historical. The same wedding photographed in color reads as a story you can step into. The information gap is small in pixels and enormous in emotional impact.
The traditional way to recover that color was a skilled retoucher with a Wacom tablet, reference photographs, and twenty to forty hours per portrait. The cost ran into the hundreds of dollars per image, which meant most family archives were never colorized at all.
How AI Colorization Actually Works
A colorization model is not "guessing" colors. It is making statistical inferences from millions of training pairs of grayscale and full-color photographs covering specific decades, locations, fabrics, lighting conditions, and skin tones. When the model sees a wool overcoat in a 1948 portrait taken in indoor tungsten light, it has seen tens of thousands of similar coats in similar light and knows the realistic color distribution that wool dye and tungsten illumination produce on photographic film of the period.
DVDFab Store runs three coordinated processes during a single colorization pass:
Semantic segmentation. The model first identifies the components of the scene — faces, hair, clothing, foliage, sky, structures, accessories. Each element is treated as a distinct subject for color reasoning, so the model is not assigning a single global color cast to the whole frame.
Era-conditioned color prediction. For each segmented region, the model predicts color values conditioned on the photograph's apparent era. Skin tones, hair colors, fabric dyes, paint pigments, and even chlorophyll levels in vegetation have shifted across decades — the model accounts for this rather than applying a generic 21st-century palette.
Edge-aware blending. Color values are interpolated across the image with edge detection, so the boundary between, for example, a dark sweater and a face does not bleed. This is what separates a clean colorization from one that looks like a watercolor wash.
The result is a colorization that, on careful inspection, reflects how a color photograph from that period would actually look — faintly muted, slightly warm in interior shots, period-correct in saturation. It is not a hyper-saturated, modern Instagram-style render. That restraint is the model doing its job correctly.
What DVDFab Store Does Differently
The colorization tool sits inside a broader photo restoration suite on DVDFab Store that handles damage, fading, scratches, and resolution loss in the same pass. That matters because most old photos arrive with multiple problems at once. A dedicated colorizer that returns a beautifully colored but still scratched image is not solving the actual problem.
A few specific behaviors worth knowing about:
Faces are processed at higher resolution. The model identifies faces in the frame and runs a higher-precision pass on facial pixels — finer color blending, more careful eye and lip color reasoning, more conservative skin-tone selection. The rest of the image processes at a lighter weight, which keeps the whole job fast.
Period detection is automatic. You do not need to tell the system "this is from 1948." The model reads visible cues — clothing styles, hair, environmental details, even film grain characteristics — and conditions its color predictions accordingly. You can override the era manually for ambiguous cases.
Output preserves the original tonal range. A common failure mode in lower-quality colorizers is to brighten or contrast-stretch the source image during colorization, which destroys the original mood. DVDFab Store keeps the source luminance untouched and adds color information as a separate layer, so the photograph still feels like the photograph.
Step-by-Step: Colorizing a Photo
The full workflow takes well under a minute for a single image.
Step 1 — Scan or photograph the original. For prints, scan at 600 dpi if the original is wallet-size or smaller, 300 dpi for standard print sizes, and 200 dpi for anything larger than 8×10. For loose photographs without access to a scanner, a smartphone shot taken in even, indirect daylight against a flat surface works surprisingly well — keep the camera parallel to the photograph and crop tightly.
Step 2 — Upload to DVDFab Store. Open the tools page and select the colorization tool. JPEG, PNG, TIFF, and HEIC inputs are all accepted. Drag the file in or use the file picker.
Step 3 — Review the period detection. The model displays its inferred decade in the editor. If the photograph is from a clearly identifiable period — a known date on the back, a recognizable historical context — you can override the era to refine results. For most photos, the automatic detection is accurate.
Step 4 — Process and review. Click colorize. The result appears in a split-view editor next to the original. Pay attention to faces first — if skin tones look right, the rest of the image almost always follows. Examine clothing, especially anything that should be a specific known color (a uniform, a school sweater, a flag).
Step 5 — Adjust if needed. A warmth slider and saturation slider let you fine-tune the output without re-running the whole colorization. Most photos look correct on the first pass.
Step 6 — Download. Output resolution matches input resolution. The file is delivered as JPEG (smaller, suitable for sharing) or PNG (lossless, suitable for printing).
For larger archives — entire albums, decades of accumulated family photos, or community archive batches — DVDFab Store AI Pro processes batches with consistent era and warmth settings across the set, so the photographs look like they belong to a single archive rather than a series of independent guesses.
Getting the Best Results
The output quality depends substantially on what you feed the model. A few habits make the difference between a photograph that looks restored and a photograph that looks processed.
Scan with controlled light. A flatbed scanner with the cover closed produces consistent illumination. Phone photographs taken near a window are acceptable but introduce vignetting and color casts that the model has to work around. If you have access to a scanner, use it.
Clean the print first. Surface dust, lint, and fingerprints look like image content to the AI, which can interpret them as scratches and process them aggressively. A soft brush and one minute of attention before scanning saves real quality on the output side.
Keep the original full-frame. Crop, rotate, and color-correct after colorization, not before. The model uses environmental context — backgrounds, secondary subjects, even the edges of the frame — to inform its color decisions on the primary subject. Cropping tightly to a face before processing removes that context.
Preserve the original. Save the colorized output as a new file and keep the unmodified scan. Future colorization models will be better than today's, and you may want to re-run the photograph in five years with fresher technology.
Match the era to the moment. A 1942 wedding photo and a 1968 prom photo carry very different emotional registers and color expectations. Trust the model's period detection but compare the result against any other color photographs you have from approximately the same time. If the colorization looks like a different decade, the era detection is probably the issue and worth overriding.
Frequently Asked Questions
What types of photos work best for colorization?
Portraits with clear facial detail, well-lit group photographs, and outdoor scenes with recognizable elements (sky, foliage, buildings) all colorize cleanly. The harder cases are extreme close-ups with no environmental context, very dark or underexposed prints, and photographs with unusual stylistic processing like solarization or hand-tinting.
Can the AI colorize damaged or torn photos?
Yes — the colorization tool runs alongside damage repair in the same pass. Cracks, scratches, and fading are addressed before color is applied, so the output is both restored and colorized. For severely damaged prints — large missing areas, water damage, heavy mold — results vary, and a manual review is recommended.
How accurate are the colors really?
For everyday clothing, skin tones, and natural environments, the colors are statistically grounded and historically plausible. For specific known objects — a particular military uniform, a sports jersey from a known team, a custom-painted vehicle — the model produces reasonable color but cannot guarantee an exact match. If accuracy on a specific object matters, run the colorization and then manually adjust that object using a photo editor.
Will the AI invent details that were not in the original?
The colorization model adds color information to existing pixels but does not generate new image content. The damage repair tool is more interventionist — it reconstructs missing pixels using context from surrounding image data. For documentary or genealogical use, the colorization-only mode is a more conservative choice; the full restoration is more visually complete but interpretive.
What resolution should I scan at?
For print sizes 4×5 inches or smaller, 600 dpi. For 5×7 to 8×10 prints, 300 dpi. For larger prints, 200 dpi is sufficient. Higher resolutions produce better results but increase processing time. The ceiling is the actual sharpness of the original photograph, not the scanner — at some point additional dpi just records emulsion grain.
Can I colorize photos from a phone screenshot or downloaded image?
Yes, though the input quality limits the output quality. A phone screenshot of a low-resolution scan will produce a colorization at that lower resolution. For best results, scan or photograph the original print directly rather than working from compressed digital copies.
How long does colorization take per photo?
Single-photo processing is typically under fifteen seconds. Batch processing through DVDFab Store AI Pro runs in parallel and processes a hundred-photo album in roughly five to ten minutes.
Are my uploaded photos kept private?
Photos are processed in an isolated session, transmitted over HTTPS, and deleted automatically when the session ends. Photos are not used for model training. For organizations with stricter privacy requirements, an enterprise account offers additional data-handling guarantees.
Can I color-correct after the AI has processed the photo?
Yes. The output is a standard JPEG or PNG that can be opened in any photo editor. The colorization is permanent in the file, but every pixel can be adjusted individually after the fact. For minor warmth or saturation tweaks, the in-editor sliders are usually faster.
Does the tool work on color photographs that have faded?
Yes, in restoration mode. A faded color photograph from the 1970s or 1980s — where reds have drifted toward magenta and overall saturation is low — can be processed by the same tool, which restores correct color balance based on the inferred original characteristics. This is a different process than black-and-white colorization but uses overlapping technology.
Is there a free trial?
New DVDFab Store accounts include complimentary colorizations to evaluate output quality on your own photos before committing. For unlimited use and batch processing, DVDFab Store AI Pro is available with monthly, annual, and lifetime plan options. Most users find the lifetime plan economical if they are working through a large family archive.
Can I share or print the colorized photos commercially?
Yes. Photos you process through DVDFab Store remain entirely your property, and the output files have no watermarks, no metadata tags marking them as AI-generated, and no licensing restrictions on commercial use. Prints, books, gallery exhibitions, and editorial use are all permitted.